-2.png?width=156&height=60&name=Hawkin%20Logo%20(2)-2.png)

Isometric Mid-Thigh Pull - The Basics
> Watch Dr. Paul Comfort talk about the IMTP on YouTube here.
The isometric mid-thigh pull (IMTP) is an assessment of an athlete’s force-producing capabilities. Previous research shows that maximal isometric force is greater than maximal concentric force production. Making peak isometric force testing a true measure of an athlete's maximal force generation ability.
One of the most researched metrics during the IMTP is the Rate of Force Development (RFD). RFD takes into account the time it takes for an athlete to develop peak force. The ability to develop peak force rapidly is a highly sought-after physical quality in all sports. Typically, the athlete that can develop more force faster will be the better athlete.
RFD is typically analyzed in specific time windows ranging from 50-250 ms.
IMTP Protocol & Best Practices:
**The Isometric Test will ask for a bodyweight prior to the test - we recommend performing a CMJ prior, as the bodyweight will then automatically pull into the system**
Setting up the force plates for IMTP
-
Ensure the force plate is placed on a flat surface and level
-
Zero the force plate prior to beginning the test
-
Conduct a pre-test trial to ensure the force output is zeroed in properly
-
Use "Free Run" with no athletes on the plate > view average force of the Left & Right plate > you want an average force reading below 3 Newtons
-
-
Adjust the bar height according to the athlete’s lower body limb length
-
Body position should be comparable to the second pull position of the clean
-
Knee angles should be between 125-145 degrees
-
Hip angles should be between 140-150 degrees
-
A self-selected angle between the above-recommended ranges is best practice in the applied setting
-
-
A clean grip with lifting straps, or an alternating grip without lifting straps should be used to ensure maximal force production is achieved and grip strength is not a limiting factor
-
The best practice is to standardize grip width or measure grip width for each athlete to ensure test repeatability
-
In a research setting clean grip, lifting straps, and hands taped to the bar should be used
-
In a practical setting, it may be more time-efficient to have athletes use an alternating grip without straps
-
Either way, standardize the grip used between sessions (i.e. lifting straps or alternating grip)
-
Foot position should also be measured to ensure repeatability, however in an applied setting this may not always be feasible
-
Warming-up for the IMTP
-
Perform a general warm-up and dynamic warm-up prior to performing the submaximal pulls
-
The general warm-up should include a combination of bodyweight squats, lunges, and any other movements you deem necessary
-
The dynamic warm-up should include low and moderate load mid-thigh pulls, or dynamic movements that are similar in nature to the IMTP range of motion (i.e. CMJ, hip hinges)
On the Force Plates - Beginning the IMTP
-
Have the athlete perform 3-second submaximal pulls at 1x50%, 1x75%, & 1x90% of perceived maximal effort prior to the maximal pull
-
Allow for at least 60-seconds of rest between each pull
-
These pulls can be completed on or off the force plates, if they are completed on the force plates a "tag" should be applied to indicate that these were not maximal pulls and are not included in the maximal pulls analysis
-
Cue the athlete to step onto the force plates and perform a maximal pull
-
Cue the athlete to remove all slack out of the bar, without pre-tensing the involved muscles
-
If you are using a rack for testing, ensure that the bar is snug against the hooks or pins
-
Bands may be attached above to hold the bar in place
-
Cue the athlete to remain still during the quiet period, this ensures a proper system weight is recorded for the athlete
-
Cue the athlete that the test is beginning and they have 3-seconds before they need to maximally pull
-
Cue the athlete to “push their feet into the ground as fast and as hard as possible”
-
It is important to overemphasize pushing into the ground instead of pulling up on the bar, as research has showed this to be most effective
-
Allow the athlete to pull for a period of 2-4 seconds before stopping
-
Cue the athlete to remain still on the force plate until the trial is saved
A minimum of 2-trials should be performed in order to determine the athlete’s peak isometric force output. If after the second trial the athlete’s force output is higher than the first, the practitioner should have the athlete perform additional tests until the peak force output drops. This will ensure that the maximal force output was recorded for that day.
It is important to overemphasize pushing into the ground instead of pulling up on the bar, as research has shown this to be most effective.
Considerations
-
Strong verbal encouragement should be given by both the practitioner and teammates
-
Research shows that verbal encouragement ensures maximal effort is achieved
-
To ensure repeatability of testing conduct the test on the same day and time between testing sessions. This will ensure comparisons of data can be drawn and interpretations can be made
-
Maximal force output is correlated to the readiness of the individual. If maximal force output is unexpectedly significantly lower than average, the practitioner should address the individual and training adjustments should be made
Analysis
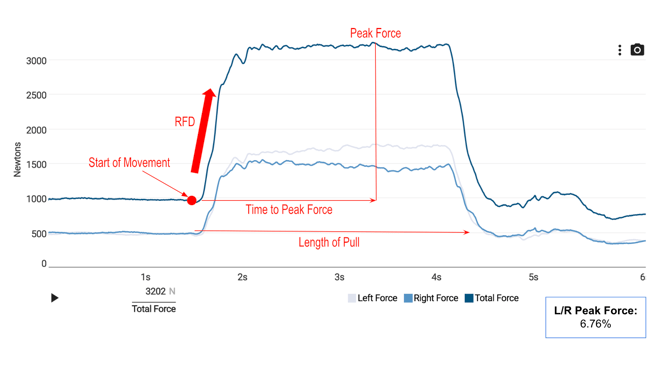
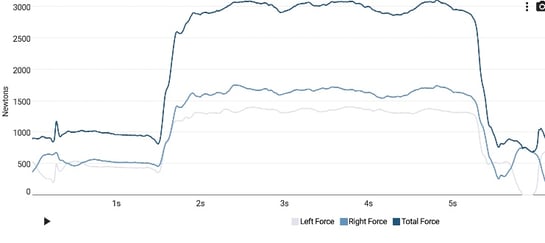
After the athlete has performed the test it is time to analyze the force-time curves. Ensure that the athlete’s system weight during the quiet period is consistent with the previous IMTP system weight.
The Hawkin Dynamics software allows the practitioner to view and analyze 16 metrics.
The figure below is an example of what the IMTP force-time curve will look like:
IMTP in the Squat Rack
The best practice would be to use a machine made specifically for the IMTP. However, the IMTP can also be completed using a squat rack. In the rack, the hooks or pins can be adjusted for the proper height of the athlete’s lower limbs. The athlete will then step onto the force plate and perform an overcoming isometric contraction into the hooks or pins. A sample video can be found here.
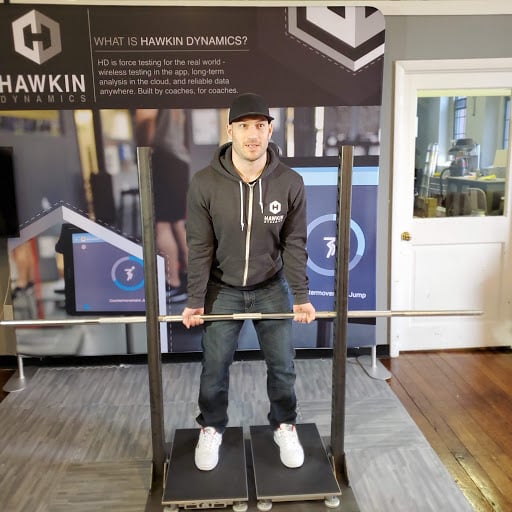
Hawkin Dynamics lead developer ripping an isometric mid-thigh pull in the original HD HQ.
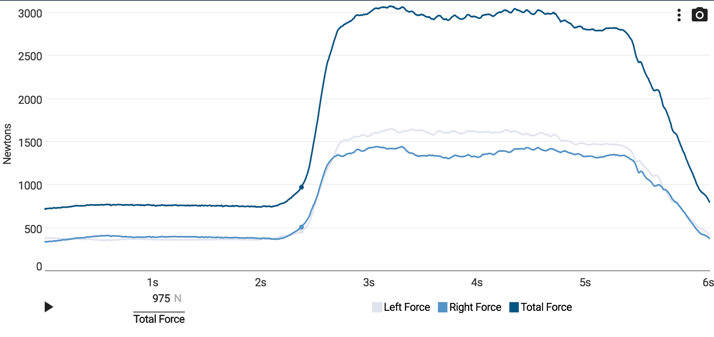
What does a failed test look like?
If an athlete produces a force-time curve that looks like this, the best practice is to rid the test and have the athlete complete another trial.
This test is "failed" because the athlete failed to stand still during the quiet phase. This is shown at the 0.3-second mark when the system weight spikes. The athlete also used their stretch-shortening cycle prior to beginning the pull. This is shown at the 1.5-second mark when the curve dips down below system weight.
Sources:
-
Comfort, Paul & Dos'Santos, Thomas & Beckham, George & Stone, Michael & Guppy, Stuart & Haff, Guy. (2018). Standardization and Methodological Considerations for the Isometric Midthigh Pull. Strength and Conditioning Journal. 41. 1.