-2.png?width=156&height=60&name=Hawkin%20Logo%20(2)-2.png)
.png?width=780&height=439&name=CenterofPress_release%20(1).png)
If there’s one thing you need to know about us at Hawkin Dynamics, it’s that we constantly strive to optimize the user experience. We want you to have access to the most useful, practically impactful, and scientifically robust testing protocols, and the most appropriate metrics to help you explain how your clients perform during these tests. We want you to be able to access all of them as easily as possible. The most recent, addition to this is our new Center of Pressure feature. This is exciting because it’s going to enable a lot of you to get an even better understanding of what your clients can and can’t do. And, perhaps most importantly, what you and they can do about it. As with all metrics though, we need to ensure that we know exactly what we’re looking at. So, the main aim of this blog post is to provide an overview of what we mean by the Center of Pressure so that you can decide whether it’s something that could be useful for you (and your clients), what it means, and what to look out for.
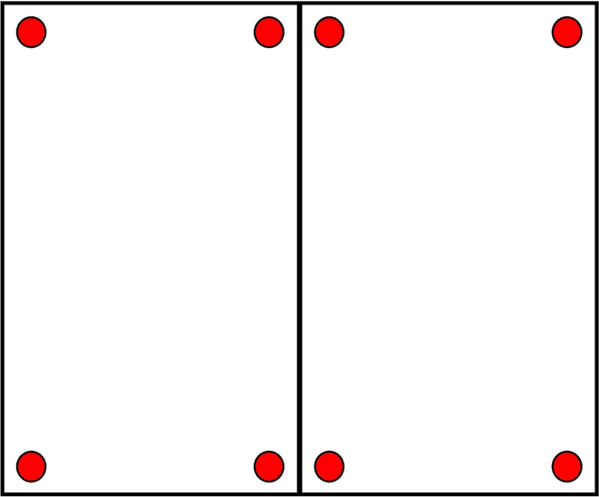
Figure 1. The red circles represent the location of the force sensors in a pair of Hawkin Dynamic force plates.
Definitions
Let’s be logical about this and start with the basics: What is the Center of Pressure?
The simplest definition I’ve come across is the one provided by Chockalingam and Healy (2018), where they explain that the center of pressure is:
“...the point of force application...” (pp. 94)
If we look at Figure 1, we can see that, like most force plate systems, the Hawkin Dynamics force plates have a force sensor in each corner. These are represented by the red circles. Each of these records vertical force and we add vertical force data from the four sensors of each plate to get the left and right plate vertical force. Ideally, our clients will always start their foot-floor interface-based tests with each (or one if a unilateral test) foot in the geometric center of each force plate. We can see this in Figure 2. If our client can stand perfectly still with each foot placed on the geometric center of each force plate, the center of pressure for that moment in time would be the geometric center of each force plate. We can see this in Figure 3.
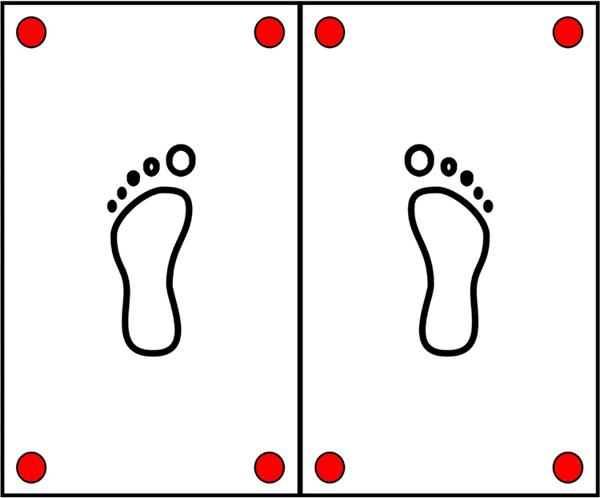
Figure 2. Our client standing in the geometric center of each of the force plates.
However, for this to make any practical sense we should look for examples. In his chapter on force plates, Burden (2019) provides some examples of how we can use the center of pressure to get a better understanding of clients. For example, he explains that movement of the center of mass and center of pressure is mirrored while clients stand or perform tasks that require them to keep their base of support as still and consistent as possible, suggesting that this could be applied to sports like archery and shooting (pp. 339). When we stand still, our center of mass moves horizontally (e.g. side-to-side, forward-backward) relative to our base of support (definition below). We call this sway, and we can use our center of pressure to quantify this. There are a couple of things to remember here though so humor me while I revisit some of the core concepts needed to have a good working definition.
First, what is the center of mass? This is the point about which our mass, the stuff we’re made of (e.g. muscle, bone, connective tissue, organs) is distributed. When we stand still and upright, it’s located approximately at and just behind our belly buttons (umbilicus). However, if we press a barbell overhead, our center of mass will rise too. Lean to the left and our center of mass will move to the left too. One note of caution here though, movement of the location of our center of mass will be related to but not as far as how far the barbell moves when we press it overhead or how far we lean to our left.
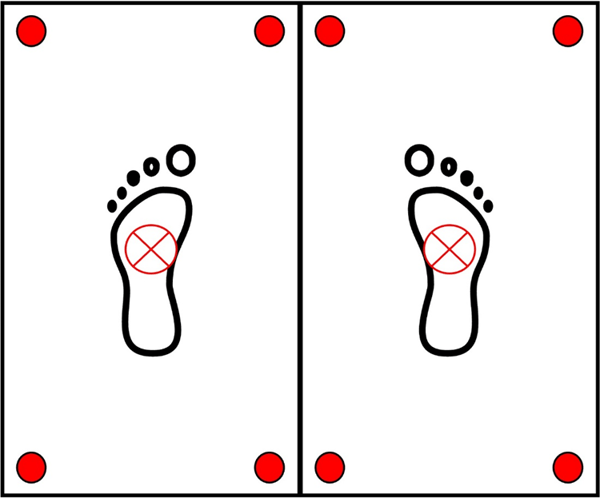
Figure 3. If the client was able to stand perfectly still with each foot in the geometric center of each force plate the circle with the red ‘X’ would represent the location of the center of pressure location within each force.
Stability and Balance
Before we define stability, we need to define balance, which, as Newton (2011, no, not that Newton, but a world leader in this field nonetheless) defines as balance as
“... the process of controlling the body position and movements in either static or dynamic equilibrium for a given purpose...” (pp. 96)
Stability describes our ability to maintain our balance (or not). One way to think about this is to consider the factors that can influence stability. According to Newton (2011, pp. 96-97), there are four things:
-
The base of support
-
The mass of the object
-
The height of the center of mass
-
The location of the center of mass relative to the edges of the base of support
In the list above, the first point refers to the parts of the body that are in contact with the ground. For this blog, we’ll keep it simple and consider standing so that the base of support is our feet. While we might need to change our base of support during day-to-day and sporting tasks, we want to try and keep this as consistent as possible during our center of pressure (or indeed all force plate) testing to maximize the consistency of our method. This, in turn, enables us to have greater confidence in how true any differences between tests we record. The less consistent our standing position, the less confident we should be about our center of pressure results. However, it’s the combination of the first three points, as brought together in point four (what I referred to as sway above), that really outlines what we’re assessing. If we use the same client test positions from trial to trial, then the first three points shouldn’t change, and if they don’t change, they won’t impact our results.
A Working Definition and Examples
So, a working definition of how the center of pressure can be used to help you assess your clients is:
“...how effectively can our client control the distribution of their mass within their base of support...”
Or, how effectively they can control sway (sometimes referred to as postural sway). I think that as you read this many of you will be able to think of examples where this could be incredibly important. If we start with an obvious example, what happens when one foot is positioned off-center on one of the force plates? Figure 4 shows that if we move the right foot to the right and up from the center of the right force plate, we can see that the center of pressure on that force plate moves accordingly.
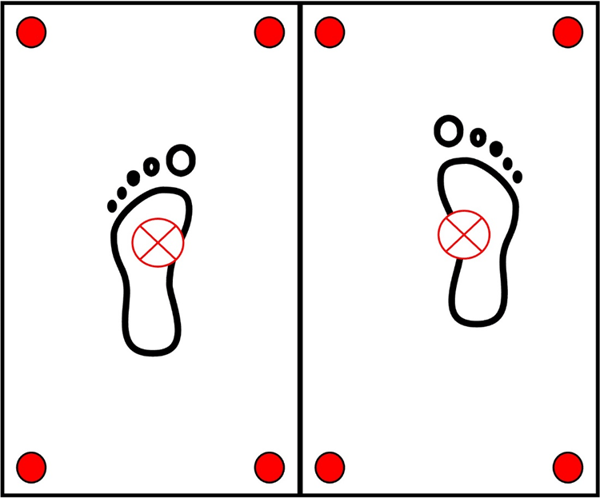
Figure 4. What happens if we move our base of support so that the right foot moves towards the forward and rightward edge of the right force plate? The location of the center of pressure for both feet moves commensurately, as represented by the circle with the red ‘X’.
Building on this example, let’s look at Figure 5. It shows the feet in the same, geometric center location, but the center of pressure, as represented by the red circles with the red ‘X’ has moved to the right.
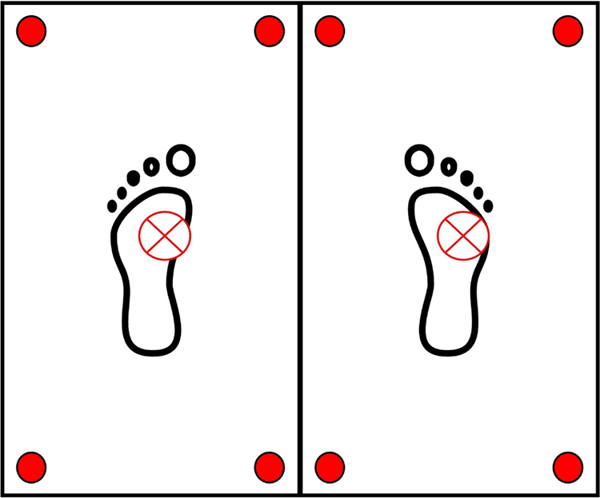
Figure 5. Here, the feet remain in their original position. However, any sway, or movement of the parts of the body sufficient to change the horizontal (e.g. side-to-side, forward-backward) position of the center of mass relative to the base of support will change the center of pressure.
Tracking the Center of Pressure
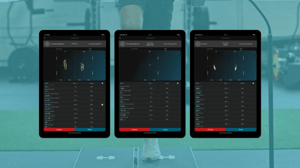
But, what about time? I hear you cry. Okay, maybe not, but we all know that the Hawkin Dynamics force plates record vertical force at 1000 samples per second, or every 1 millisecond (ms). Sway is the movement of the center of mass relative to the base of support over time. As I said at the beginning of the blog, we want you to have access to the most effective and scientifically robust test protocols and won't disappoint on this front when it comes to the center of pressure. Additionally, as with all things Hawkin Dynamics, the results are presented beautifully. If you look at Figure 6, you can see that each force plate has been split into quadrants. In Figure 6 you can see that we have a left and right force plate. Further, each has been split into the following:
-
Anterior-lateral (forward and outward)
-
Anterior-medial (forward and inward)
-
Posterior-lateral (backward and outward)
-
Posterior-medial (backward and inward)
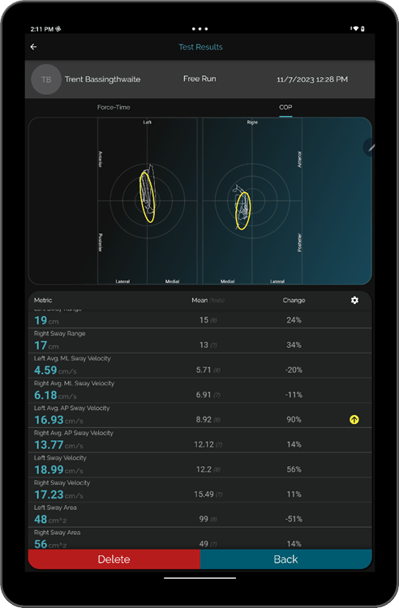
Figure 6. An example of the output you can expect to get of the center of pressure measure from the free-run test protocol within the Hawkin Dynamics software.
This provides context, which will help you, the user, gauge how effectively your client can control their sway. For example, has your client’s sway increased dramatically? If so, what could have caused this? These are the sorts of questions you could be asking to help you get the most out of these new metrics. For comparison, let’s look at the sway in Figure 7. What do you notice? A larger sway? Definitely. However, also note the absolute position of each side’s center of pressure. They’re different, right? Why? The first thing to check would be the position of the feet at the start of the test (as mentioned above). If the feet are in their normal position, but you find this kind of difference then you can start to think about what’s going on to have lead to this.
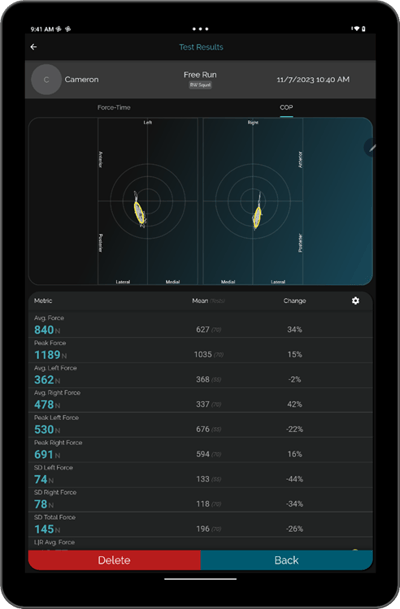
Figure 7. Sway data from another client.
We now have a better understanding of what balance is. How can we test this? Figure 8 shows us the results of a single-leg balance test. We literally have our clients stand still on one leg and how still they’re able to stand or how well they’re able to keep their balance will be reflected in the magnitude of their sway.
References
Burden, A. (2019). Force plate. In P. Grimshaw, M. Cole, A. Burden, & N. Fowler (Eds.), Instant notes in sport and exercise biomechanics (2nd ed., pp. 339). Routledge.
Chockalingam, N., & Healy, A. (2018). Measurement of external forces. In C. J. Payton & A. Burden (Eds.), Biomechanical evaluation of movement in sport and exercise: The British Association of Sport and Exercise Sciences Guide (2nd ed., pp. 91-115). Routledge.
Newton, R. (2011). Strength and conditioning biomechanics. In M. Cardinale, R. Newton, & K, Nosaka (Eds.), Strength and Conditioning: Biological principles and practical applications (1st ed., pp. 89-101). Wiley-Blackwell.